Wrecking Crew
NES Game Guide
Wrecking Crew is an action-puzzle game for the NES, released in 1985.
Mario (and Luigi) must hammer down all the stone walls on the demolition site while avoiding Foreman Spike and his lackeys. Along the way you can find loads of hidden bonuses.
There are 100 levels to play through, and a Design mode where you can create your own levels.
Releases
| System | |||
|---|---|---|---|
| NES / Famicom | 18 June 1985 | October 1985 | 1987 |
| Famicom Disk System | 3 February 1989 | - | - |
| Game Boy Advance Classic NES Series / Famicom Mini | 21 May 2004 | - | - |
| Wii Virtual Console | 5 February 2008 | 19 November 2007 | 24 August 2007 |
| Nintendo 3DS Ambassador Program | 31 August 2011 | 31 August 2011 | 31 August 2011 |
| Nintendo 3DS Virtual Console | 19 September 2012 | 7 March 2013 | 9 May 2013 |
| Wii U Virtual Console | 19 June 2013 | 20 June 2013 | 20 June 2013 |
| Nintendo Switch Online | 17 July 2019 | 17 July 2019 | 17 July 2019 |
Also available to play in:
- Wrecking Crew '98 (SNES)
Index
How to Play
- Player Characters
- Choose a Phase
- Break Every Wall
- Avoid the Enemies
- Using Bombs
- Using Doors
- Using Pillars and Drums
- Bonus Phase
Advanced Techniques
- Bomb Drops and Spike Drops
- Drum Drops
- 1-Up Letters
- Prize Bombs
- Using the Golden Hammer
- Design Mode Codes
- Demo Codes
Phase Guide
Player characters

Mario
Player 1 controls Mario in the red dungarees.

Luigi
In the 2-Player game, Player 2 controls Luigi in the pink dungarees. Players take turns each time they lose a life.
How to Play Wrecking Crew
Choose a Phase
The levels in Wrecking Crew are named Phases. There are 100 Phases to clear. You can select any Phase from the title screen.
There is no ending to the game. If you clear Phase 100, you loop back to Phase 1.
Break Every Wall
Break every wall in the current Phase to clear it and move on to the next Phase. Swing Mario's hammer to damage the wall he’s standing in front of.

Wall (1-hit)
A standard concrete wall that only takes 1 hammer swing to crumble.
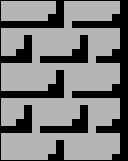
Wall (2-hits)
Hit the white brick wall with two hammer swings to break it down.
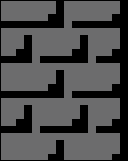
Wall (3-hits)
You'll need to strike the gray brick wall with three hammer swings.
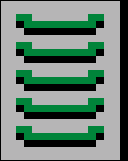
Ladder Wall
A breakable ladder that counts towards clearing the Phase. It only takes one hit to make the whole ladder crumble.
- At the start of each Phase (or if you press Start to pause), the walls you have to break to clear the Phase will be flashing.
- All walls are worth 100 points when you knock them down on their own.
- If you break multiple walls in a row (including tall Ladder Walls or by using Dynamite) then the first wall is worth 100 points, the second is worth 200 points, the third is worth 400 points, and every other wall after is worth 800 points.
- Don't knock down White Ladders until you're sure you have cleared any high platforms.
- Break a White Ladder while an enemy is climbing on it and they will fall to the bottom of the level.
Avoid the Enemies
Foreman Spike and his lackeys wander around the building site causing trouble for Mario.

Foreman Spike
The mean foreman tries to sabotage Mario. He follows you around in the background and swings his hammer at walls and other objects you're standing in front of. If he breaks the wall, you will be knocked to the bottom of the level. You can also knock Spike to the bottom by breaking the wall first.
In the Bonus Phase, you have to find the Coin before Spike does.

Gotcha Wrench (Red)
A cross between a dragon and a wrench. It runs around and climbs ladders, chasing after Mario. It will often only change direction when it reaches a ladder.
Gotcha Wrench (Purple)
The Purple variety of Gotcha Wrench moves faster than the Red variety.

Eggplant Man
Eggplant Man doesn't chase Mario, but runs in a straight line, only changing direction if it hits a wall. It drops off the ends of platforms and climbs any ladders it encounters. They usually travel in groups, so beware of getting trapped.

Fireball
If Mario spends too long on a single storey of the building site, a fireball will appear at the side and move in a wave pattern across the stage, disappearing at the other side. The longer you take to clear the level, the more frequently fireballs appear. It is possible to run under them with good timing.
Using Bombs

Striking a Bomb will cause it to explode. After hitting it, you have a moment to move out of its way or the explosion will knock you to the bottom of the level. The explosion causes a shockwave that cracks any walls along the same row until it reaches a gap.
Bomb Drop
On some levels, you will need to use a Bomb to intentionally drop to the bottom of the level. This could be to reach an unreachable area, avoid being cornered by enemies, or simply to take a shortcut. This is referred to as a Bomb Drop in this guide.
Prize Bombs
In Phases with 3 or more bombs, one bomb will reward you with a prize if you meet certain conditions.
Using Doors

The door opens if you strike it with the hammer or explode a Bomb somewhere on the level.
Enemies who pass the door while it is open will walk through it and appear as shadows in the background. While enemies are in the background, they are unable to harm Mario. If enemies in the background pass by an open door, they will pop back out into the foreground.
Using Pillars and Drums

Pillar
A supporting metal strut. Hit it once with the hammer to break it and cause whatever is on top of it to drop down to your level.

Drum
A large metal drum that blocks off sections of the level. You can walk on top of them like a platform as well.
Hit a pillar with a Drum on top and it can fall down and block the path of pursuing enemies. If you time it well, the Drum can even drop on top of the enemy and trap them underneath. Beware! If Mario is standing under the Drum when it drops, he will also be trapped, forcing you to reset the game.
If you Bomb Drop onto a Drum, you can move around safely behind it. Some later Phases will require you to use this technique.
Bonuses
1-Up Letters

Many Phases contain walls that hide the letters M, A, R, I and O (or L, U, I, G and I for Player 2).
If you can make all five letters appear in the correct order, you will receive an extra life.
If you hit them out of order, then the remaining letters will not appear.
Some Phases have 1-Up Letters, but it's impossible to find them all.
In Design mode, build a level with enough wall objects and the letters will be hidden automatically. It’s not clear how placement is decided, but it does not appear to be random.
Prize Bomb
On any Phase with at least three bombs, one will be the Prize Bomb. If the Prize Bomb is the third Bomb to explode, then a prize will appear.
There are four prizes you can get:

Pig
May appear when you hit a certain bomb third in a stage. Awards 800 points.

Santa Claus
May appear when you hit a certain bomb third in a stage. Awards 1600 points.

Lucky Cat
May appear when you hit a certain bomb third in a stage. Awards 3200 points.

Golden Hammer
May appear when you hit a certain bomb third in a stage. Awards 3200 points and makes Mario extremely strong. He can hit enemies, float over gaps and break walls with ease.
The Golden Hammer is a power up item that allows you to swing the hammer faster, break every wall in a single hit, and hit enemies that are close to Mario. You can also tap the A Button quickly to float over gaps in the ground.
The prize you receive is determined by the Phase you are currently playing and the number of times you swing the hammer after the Phase begins.
Bonus Round
After every four stages, you go to a Bonus Round. Find the Bonus Coin before Foreman Spike finds it.
If the coin is behind the very first wall you break, you get a Super Bonus of 10,000 points.
Phase Guide
This guide shows you how to clear each level and explains how to activate the bonuses (where possible). The maps show which walls hide Letters and which Bomb is a Prize Bomb. If they are coloured red on the map, it's impossible to get them.
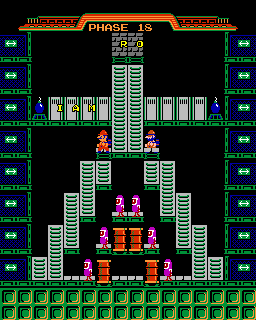
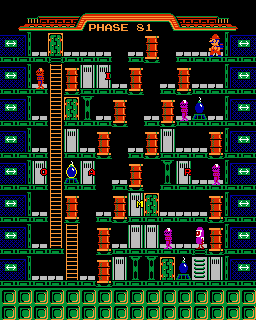
Phase 01
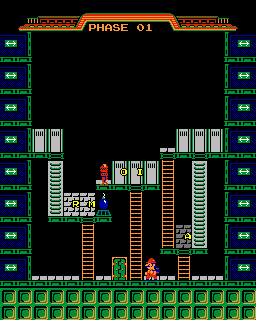
Solution
A simple level to introduce you to the main elements of the game. You can’t trap yourself on this level.
- Climb up each of the ladders and break all the walls, avoiding the lone Gotcha Wrench.
- Break the high up walls before breaking the white ladders. You can't get stuck, but it's easier to leave them to last.
Letters
- M: Climb up the leftmost ladder and break the brick wall at the top.
- A: Climb up the rightmost yellow ladder and break the dark grey brick wall at the top.
- R: Climb back up the leftmost ladder and break the brick wall slightly to the left.
- I: Climb up the middle ladder and break the wall at the top.
- O: Break the wall to the left of “I”
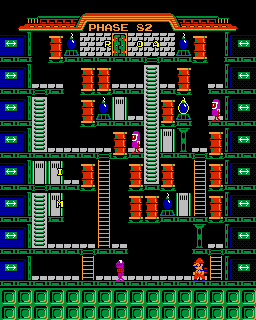
Phase 02
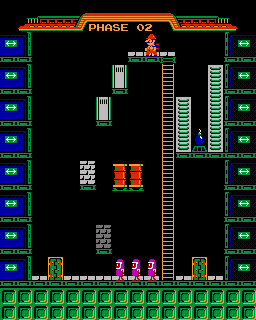
Solution
- Drop down to the left to reach the walls and brick walls suspended in the air.
- The three Eggplant Men will run in one direction and only climb a short way up the tall ladder. Drop down to the ground with good timing to avoid them, then climb the tall ladder.
- The white ladders can be taken out individually with the Hammer or together by hitting the bomb.
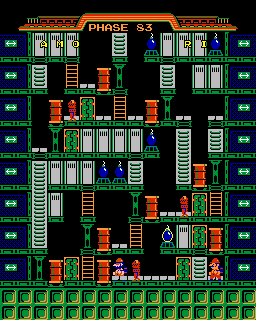
Phase 03
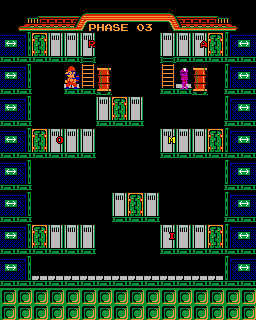
Solution
If you drop down too soon, it's possible to make this Phase unbeatable.
- Climb the ladder next to you and break all the walls at the top. Use the cut-through to reach the walls on the right.
- Drop off the top-left platform onto the drum and then right onto the suspended platform to break two more walls.
- Drop off the left side of the platform and break the next row of walls, using the cut-through to reach the walls on the right.
- Drop off the left side of the right platform to land on another suspended platform. Break two more walls.
- Drop off the right side of the platform and break the last row of walls. Use the cut-through to reach the walls on the left.
Letters
- M: From the start, drop down and cross through the left-side to reach the right-side and break the wall closest to the edge.
- It is not possible to climb back up to reach the A or R from this point, so an extra life is not possible.
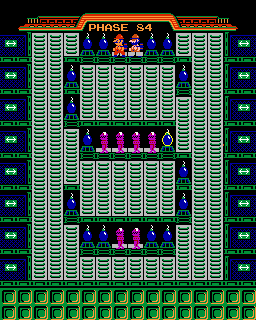
Phase 04
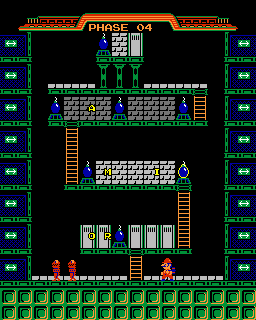
Solution
- Climb the ladder and hit the bomb to take out the row of white walls.
- Climb the next ladder and hit either bomb to take out the row of white bricks.
- Climb the next ladder and hit the middle bomb to damage the entire row of grey bricks. Finish them off with your hammer.
- Climb the final ladder and break the three pillars, then smash the final wall and white brick.
Letters
To get all the Letters, you will need to break walls without relying on the bombs. This takes longer and gives the Gotcha Wrenches a chance to catch up to you.
- M: Climb the first two sets of ladders and break the leftmost white brick.
- A: Climb the next ladder and break the grey brick 2nd from the left.
- R: Drop back to the bottom, climb the small ladder, and break the wall to the left of the lowest bomb.
- I: Climb back up and break the white brick wall 2nd from the right.
- O: Drop back to the bottom, climb the small ladder, and break the leftmost wall.
Prize Bomb
The bomb at the top of the 2nd ladder is the Prize Bomb. If this is the third bomb to explode, a prize will appear.
Golden Hammer
To get the Golden Hammer, you need to activate the Prize Bomb with your 5th hammer swing.
- Climb the ladder and hit the first bomb with the hammer.
- Swing the hammer at nothing three times then climb the 2nd ladder.
- Skip the bomb at the top of the ladder and run left to hit the next bomb. The shockwave will blow up the Prize Bomb and reveal the Golden Hammer.
Phase 05
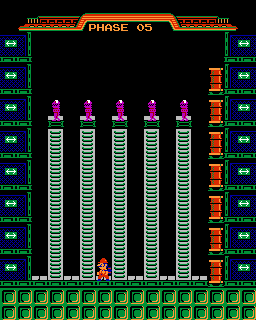
Solution
This level is a simple race. Hit the rightmost white ladder and quickly work your way to the left. The level should end before any of the falling Gotcha Wrenches reach you.
Phase 06
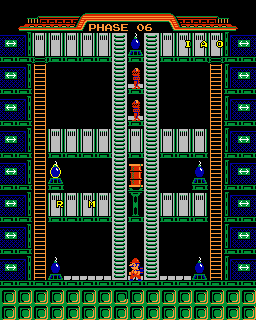
Solution
Do not break the White Ladders until you have broken the lone wall in the middle, or you cannot clear the Phase.
There isn't a specific strategy here. Keep moving around the level and breaking walls without getting cornered by the Gotcha Wrenches. Lure them away using the cut-throughs and ladders.
This is the first Phase where you can trap an enemy under the drum by breaking the pillar as they approach. Beware, as Mario can also be trapped under the drum if you don't move fast enough.
Letters
- M: Climb up a ladder to reach the first level. Break the 3rd wall from the left.
- A: Climb to the top level and break the 2nd wall from the right.
- R: Climb back down to the first level and break the 1st wall on the left.
- I: Climb back up to the top level and break the 3rd wall from the right.
- O: Stay on the top level and break the 1st wall from the right.
Prize Bomb
The bomb halfway up the left ladder is the Prize Bomb. If this is the third bomb to explode, a prize will appear.
Golden Hammer
To get the Golden Hammer, you need to activate the Prize Bomb with your 3rd hammer swing.
- Hit the bomb on the bottom-right
- Hit the bomb on the bottom-left
- Climb up the ladder on the left and hit the bomb on the left side to reveal the Golden Hammer.
Phase 07
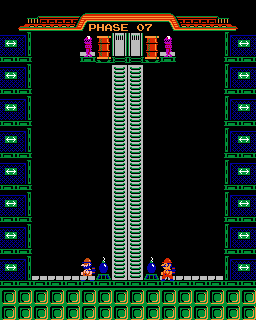
Solution
Foreman Spike appears for the first time. He’s safe to touch, but he will try to break walls and knock you to the bottom of the level.
- As fast as you can, climb to the top of the white ladders and break the two walls.
- Return to the bottom. Either climb down, drop down or let Spike knock you down.
- Avoiding the Gotcha Wrenches, hit the white ladders or one of the bombs to clear the Phase.
Phase 08
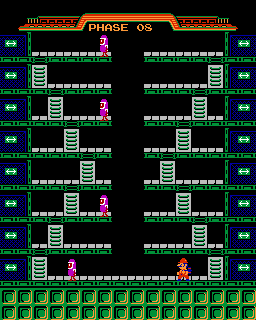
Solution
To clear this Phase, you will need to watch the simple pattern of the four Eggplant Men, climb to the top of the level and work your way back down. This is easier if you climb up the left side of the stage.
Once you reach the top, use the cut-throughs from left-to-right and right-to-left, breaking the white ladders on your way down. Once you reach the bottom, the Eggplant Men will be bunched up. Look for a gap and deal with the final few ladders when it is safe to do so.
Phase 09
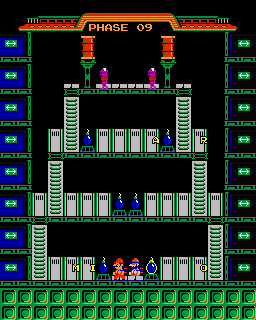
Solution
The trick to this level is to distract Spike so he doesn't hit any bombs or white ladders. Slow him down by hitting the wall he's hiding behind, or use the cut-throughs to confuse him. If you're feeling risky, you could lure all the enemies to the top row and trap them between the drums.
- Climb up to the top level, avoiding the enemies, and hit one of the bombs to clear out the top row of walls and ladders.
- Climb down to the second level and hit one of the bombs to clear out the second row of walls and ladders.
- Climb (or bomb drop) to the bottom level and hit both bombs to clear out the last walls and ladders.
Letters
- M: From the start, break the wall third from the left.
- A & R: Climb two sets of ladders and hit either bomb on the third level to reveal two letters.
- I: Return to the bottom level and hit the left bomb to reveal the letter.
- O: Turn around and break the right bomb to reveal the final letter.
Prize Bomb
The bomb to the right of where you start is the Prize Bomb. If this is the third bomb to explode, a prize will appear. Climb up and set off one of the bombs on the top level (exploding both of them), then bomb drop to the bottom and hit the Prize Bomb.
Golden Hammer
To get the Golden Hammer, you need to activate the Prize Bomb with your 8th hammer swing.
- Climb up and hit one of the bombs on the top level and bomb drop back to the bottom.
- Stand in the empty spot in the middle and swing your hammer 6 times.
- Hit the Prize Bomb with your 8th swing for the Golden Hammer.
Phase 10
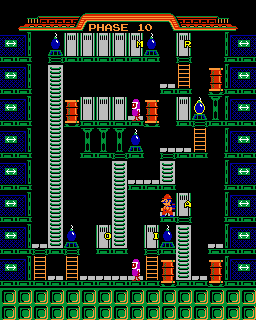
Solution
Be careful, as there are lots of ways to block yourself from clearing this level if you do things in the wrong order.
- Hit the white wall next to where you start.
- Drop down to the left and hit the bomb to take out the wall and white ladder.
- Head up the tallest white ladder and use one of the bombs to break the row of white walls.
- Drop off to the right and climb the small ladder to take out the lonely wall.
- Drop off to the right and take out the next lone wall.
- Climb down the yellow ladder, then the short white ladder, and smash it behind you.
- Climb up the longer white ladder and take out the three pillars. Make sure the Eggplant Man doesn't drop on you and break the three walls that drop down.
- Climb down the tall ladder and break it, then break the white wall next to it.
- Finally, cross over and take out the tallest ladder.
Letters
- M: Ignore all the walls near where you start. Climb the tallest ladder and break the wall farthest right on this platform.
- A: Drop all the way down to where you started and break the lone wall there.
- R: Climb all the way back to the top, drop down to the right and climb the yellow ladder to the lonely wall at the top.
- I: Drop all the way down to where you started again, then drop down to the left and break the wall next to the bomb.
- O: Clear the rest of the stage as normal, and the ‘O’ is in the lonely wall next to the central tall white ladder.
Prize Bomb
The bomb on the right hand side at the top of a yellow ladder is the Prize Bomb. If this is the third bomb to explode, a prize will appear.
Golden Hammer
To get the Golden Hammer, you need to activate the Prize Bomb with your 7th hammer swing.
- Ignore all the walls near the start. Climb the tallest ladder and hit either of the bombs to set them both off.
- Drop off to the right and swing your hammer into an empty gap 5 times.
- Hit the Prize Bomb with your final hit. Remember to step to the left, or you’ll get trapped in a drum!
Phase 11

Solution
Don't drop down too early or you won't be able to clear this Phase. You will need to lead the Gotcha Wrench away if it’s becoming a nuisance.
- Clear the walls on the top level, using the cut-through.
- Drop down and clear all the walls on the top half of the level. Be careful not to break the white ladders until you’ve cleared the white walls above and next to them.
- Drop down to the bottom level and repeat the same process, working from the top down and not breaking the White Ladders too early.
Letters
- M: Drop to the very bottom level and break the wall third from the right.
- After you get the ‘M’, it’s impossible to return to the top half of the level to get the other letters. It's not possible to get an extra life on this Phase.
Phase 12
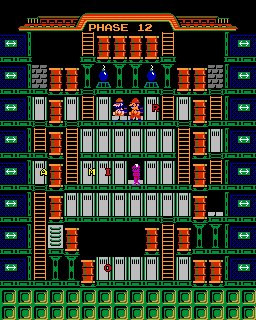
Solution
This Phase is a step up in difficulty. It's broken up into three distinct areas that you cannot return to, and if Spike knocks you down in the first area, you'll be unable to clear the Phase.
- Lure Foreman Spike behind a wall and break it quickly to knock him to the bottom.
- Clear out all the White Walls on the level you start on and the two levels beneath you, avoiding the pursuing Gotcha Wrench.
- Climb to the top and hit the left or right Pillar to knock down a ladder. Climb over the top of the drums to reach the Dark Gray Bricks.
- Work your way down the left and right sides, using the cut-throughs to break all the walls.
- Break the pillars holding up the White Ladder and the Drum at the bottom.
- Climb up the White Ladder and go over the Drums into the bottom area (where Spike is waiting). Break all the walls along the bottom, then climb the ladder and work your way from right to left. Do NOT break the final wall!
- Spike will follow you and break the wall, knocking you down behind the Drums. Walk left and break the White Ladder to clear the Phase.
Letters
- M: From where you start, climb down two levels and break the leftmost white wall.
- A: Climb out of the barrel area and down the sides. Break the white wall on the left side of the fourth level (same level as the 'M').
- As it’s impossible to return to the starting area to get the ‘R’ or 'I', it is not possible to get an Extra Life on this Phase.
Phase 13
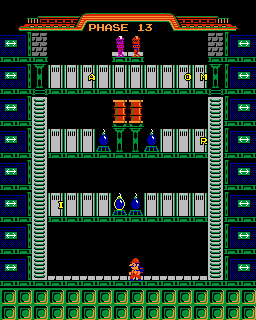
Solution
Hitting any of the bombs will destroy the ladders to the top, so avoid doing that. The trickiest part of this Phase is luring the Gotcha Wrenches away from where you want to work so they can’t trap you in a pincer move.
- Climb to the top of the tall White Ladders, break the pillars to reach the Grey Bricks, and then break all the White Walls.
- Climb down to the next leve and break all the walls here.
- Climb down to the next level and hit one of the bombs to clear the last White Walls and the White Ladders.
Letters
- M: Climb to the top and break the rightmost white wall.
- A: On the same level, break the white wall 3rd from the left.
- R: Climb down a level and break the rightmost white wall.
- I: Climb down another level and break the leftmost white wall.
- O: Return to the top and break the white wall next to the ‘M’.
Prize Bomb
The bomb on the left side of the first level is the Prize Bomb. If this is the third bomb to explode, a prize will appear.
Golden Hammer
To get the Golden Hammer, you need to activate the Prize Bomb with your 4th hammer swing. While this is possible, you will be unable to clear the Phase. Activate the Prize Bomb with your 12th hammer swing instead.
- Climb the White Ladder on the left up to the second level. Hit the leftmost White Wall to create a gap.
- Walk to the middle and hit a Pillar to drop one of the Drums. Try and trap the purple Gotcha Wrench under the Drum.
- Climb to the top level and break 6 White Walls. The red Gotcha Wrench should follow you up here.
- While the Gotcha Wrench is walking across the top, quickly climb down back to the second level and hit the Bomb on the left. The gap you created earlier should stop the shockwave from breaking the White Ladder.
- Climb down to the first level and break the leftmost and rightmost White Walls to create a gap on each side.
- Hit the bomb on the right with your 12th hammer swing. The bomb on the left will then be the third bomb to explode, revealing your Golden Hammer.
Phase 14
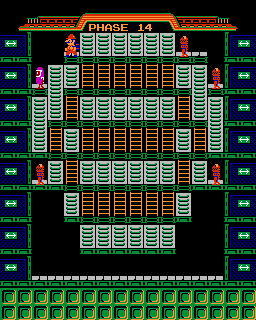
Solution
Working from the top, and being very careful to avoid the enemies, destroy the white ladders. When you get to the lower levels, do not drop down to the ground or you will need to reset. If you get an opportunity to knock enemies off a white ladder, be sure to take it, as this will make this level much easier.
Phase 15
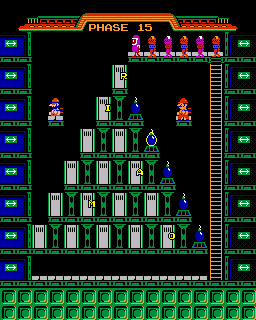
Solution
Drop down to the left and head to the left edge to lure all of the Gotcha Wrenches off the top platform (be careful of Spike, who will try to knock you down to the bottom). Run back to the right and hit the bombs on the bottom three levels. Climb up the tall ladder and drop down onto the top level. When it’s safe to do so, continue dropping down and taking out any more walls. Keep going round and round until all the walls are cleared.
Letters
- M: From the start, drop down to the left, then drop down another level to the right. Break the wall 2nd from the left.
- A: Climb back to the top and drop down. On the level above the ‘M’, break the rightmost wall.
- R: Climb back to the top and drop down. Break the top wall.
- I: Drop down one level to the left and break the wall there.
- O: Drop down to the bottom layer and break the rightmost wall.
Prize Bomb
The bomb second from the top is the Prize Bomb. If this is the third bomb to explode, a prize will appear.
Golden Hammer
To get the Golden Hammer, you need to activate the Prize Bomb with your 10th hammer swing. Drop down to the left, but do not hit this bomb (this will move the Prize Bomb down a layer and it will no longer give a prize). Drop down to the right and hit this bomb (1) then drop down again and hit the next bomb (2). When it’s safe to do so, climb the ladder to the top and swing your hammer into the gap (3-9). Now drop down to the second bomb from the top and swing (10) to activate the Prize Bomb.
Phase 16
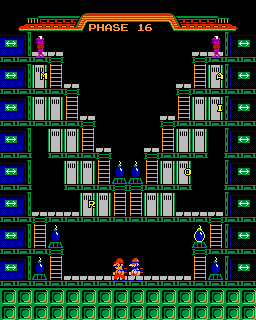
Solution
You can’t get trapped on this stage, so Spike is merely a nuisance. Being wary of the Gotcha Wrenches, climb up to the top and work your way down the level until all the walls are cleared. If you get knocked down, climb back up and continue.
Letters
- M: Climb to the top layer and break the white wall on the left.
- A: Cut through the side and break the white wall on the right.
- R: Drop down to the bottom layer of walls and break the leftmost white wall.
- I: Climb back up to the 2nd layer from the top and break the rightmost white wall (directly under the ‘A’).
- O: Climb down to the 2nd-from-bottom layer of walls (where the bombs are) and break the rightmost white wall.
Prize Bomb
The bomb at the top of the ladder on the right from where you start is the Prize Bomb. If this is the third bomb to explode, a prize will appear.
Golden Hammer
To get the Golden Hammer, you need to activate the Prize Bomb with your 9th hammer swing. Hit any two of the bombs near where you start (1-2) and then swing your hammer into the empty space (3-8). With the 9th swing, hit the Prize Bomb - and just hope Spike doesn’t hit it first!
Phase 17
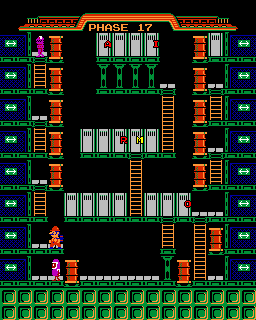
Solution
Wait for the Eggplant Man to run to the left, climb the ladder and turn around. Drop down to the right and break the pillar to make the ladder drop, then climb up to the next ladder and up to the central area. Start breaking all the walls. At the top, break the pillars to make the four walls drop down. Now you need to lure the Gotcha Wrench out of the side area so you can safely climb up to the lone wall in the top-right.
Letters
- M: After climbing up to the walls in the middle, climb the yellow ladder to the second layer and hit the wall at the top of the ladder.
- The ‘A’ and ‘I’ are in the walls on top of the pillars at the very top of the stage. However, if you hit the pillars to make the walls drop down, they will no longer reveal the letters. As it’s impossible to break the walls before they drop down, it’s impossible to get the extra life on this level.
Phase 18
Solution
Climb the ladder next to you and break the grey blocks. If Spike knocks you down, you’ll be trapped, so you want to try and knock him down first. With Spike out of the picture, you can break all the walls and white ladders in the top half at your leisure. In the bottom half, start working from the top of the right side down, breaking the white ladders while avoiding the Eggplant Men. Once you’re done, repeat the same on the left. Be cautious and take your time.
Letters
- M: Climb up the white ladder to the row of white walls, and break the third wall from the left.
- A: Break the second white wall from the left.
- R: Climb to the grey brick walls and break the one on the left (before Spike does).
- I: Climb back down to the row of white walls and break the wall on the far left (next to the ‘A’).
- O: Climb back up and break the grey brick wall on the right (next to the ‘R’).
Phase 19
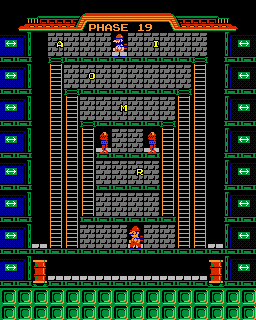
Solution
If Spike knocks you down to the bottom, you’re stuck until a fireball gets you. So try to knock Spike down first. This level is a matter of patience. Work your way around, breaking walls and luring the Gotcha Wrenches away from where you’re trying to work.
Letters
- M: Climb up to the 5th layer of walls and break the grey bricks 3rd from the left.
- A: Climb to the top layer of walls and break the leftmost grey bricks.
- R: Climb down to the 3rd layer of walls and break the grey bricks 2nd from the right.
- I: Climb back to the top level, and break the grey brick 4th from the right.
- O: Climb down to the 6th level and break the grey brick 2nd from the left.
Phase 20
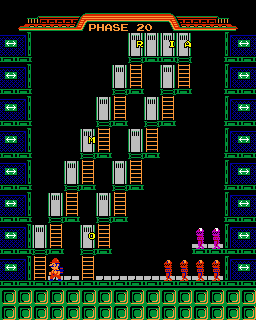
Solution
Start by climbing up the right side of the structure, breaking the white walls as you go. The Gotcha Wrenches should follow and keep away. Once you reach the top, you can either climb back down the left (if the coast is clear), or drop down, cut through from the right side to the left side and start climbing from the bottom.
Letters
- M: Start climbing up the left side and break the 4th white wall you pass.
- A: Get to the top and break the rightmost wall.
- R: Still on the top, break the leftmost wall.
- I: Still on the top, break the wall 2nd from the right.
- O: Drop or climb down and break the lowest wall on the right side of the structure.
Phase 21
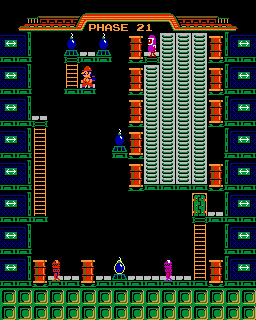
Solution
abc
Prize Bomb
The bomb XXX is the Prize Bomb. If this is the third bomb to explode, a prize will appear.
Golden Hammer
To get the Golden Hammer, you need to activate the Prize Bomb with your 4th hammer swing.
Phase 22
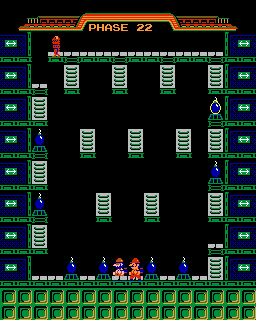
Solution
abc
Prize Bomb
The bomb XXX is the Prize Bomb. If this is the third bomb to explode, a prize will appear.
Golden Hammer
To get the Golden Hammer, you need to activate the Prize Bomb with your 3rd hammer swing.
Phase 23
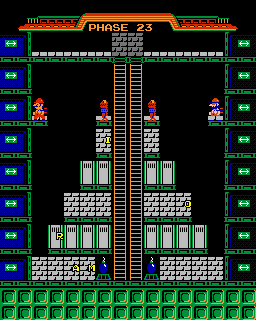
Solution
abc
Letters
- M: -
- A: -
- R: -
- I: -
- O: -
Phase 24
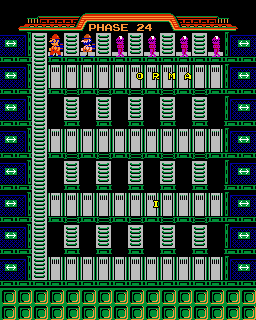
Solution
abc
Letters
- M: -
- A: -
- R: -
- I: -
- O: -
Phase 25
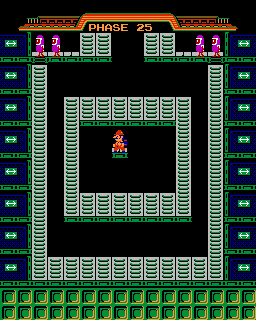
Solution
abc
Phase 26
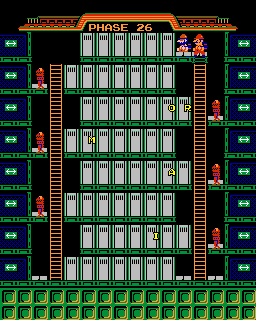
Solution
abc
Letters
- M: -
- A: -
- R: -
- I: -
- O: -
Phase 27
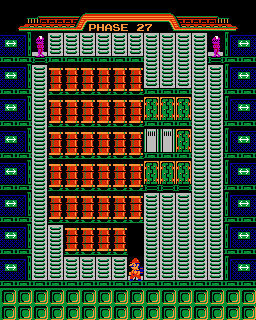
Solution
abc
Phase 28
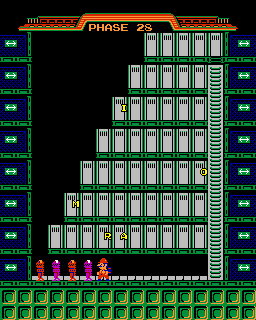
Solution
abc
Letters
- M: -
- A: -
- R: -
- I: -
- O: -
Phase 29
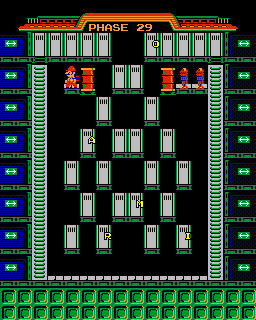
Solution
abc
Letters
- M: -
- A: -
- R: -
- I: -
- O: -
Phase 30
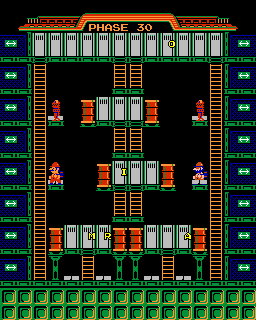
Solution
abc
Letters
- M: -
- A: -
- R: -
- I: -
- O: -
Phase 31
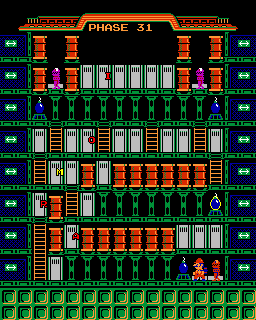
Solution
abc
Letters
- M: -
- A: -
- R: -
- I: -
- O: -
Prize Bomb
The bomb XXX is the Prize Bomb. If this is the third bomb to explode, a prize will appear.
Golden Hammer
To get the Golden Hammer, you need to activate the Prize Bomb with your 10th hammer swing.
Phase 32
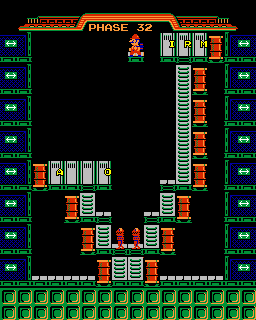
Solution
abc
Letters
- M: -
- A: -
- R: -
- I: -
- O: -
Phase 33
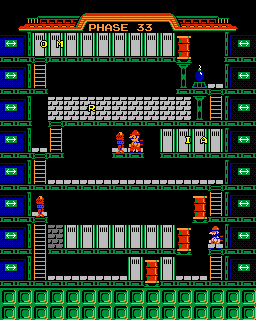
Solution
abc
Letters
- M: -
- A: -
- R: -
- I: -
- O: -
Phase 34
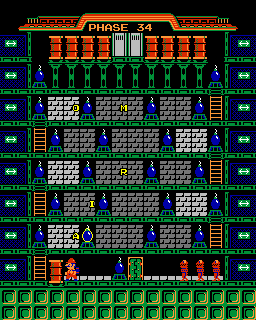
Solution
abc
Letters
- M: -
- A: -
- R: -
- I: -
- O: -
Prize Bomb
The bomb XXX is the Prize Bomb. If this is the third bomb to explode, a prize will appear.
Golden Hammer
To get the Golden Hammer, you need to activate the Prize Bomb with your 7th hammer swing.
Phase 35
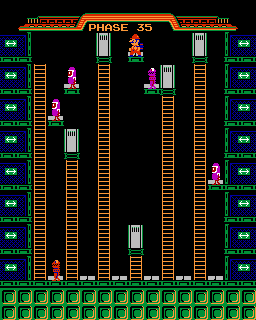
Solution
abc
Phase 36
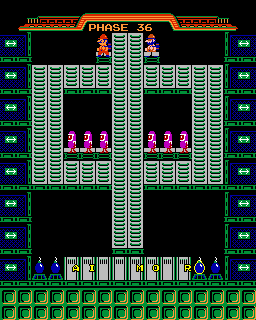
Solution
abc
Letters
- M: -
- A: -
- R: -
- I: -
- O: -
Prize Bomb
The bomb XXX is the Prize Bomb. If this is the third bomb to explode, a prize will appear.
Golden Hammer
To get the Golden Hammer, you need to activate the Prize Bomb with your 5th hammer swing.
Phase 37
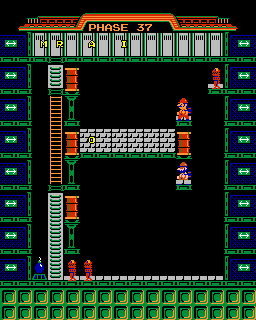
Solution
abc
Letters
- M: -
- A: -
- R: -
- I: -
- O: -
Phase 38

Solution
abc
Phase 39

Solution
abc
Letters
- M: -
- A: -
- R: -
- I: -
- O: -
Prize Bomb
The bomb XXX is the Prize Bomb. If this is the third bomb to explode, a prize will appear.
Golden Hammer
To get the Golden Hammer, you need to activate the Prize Bomb with your 10th hammer swing.
Phase 40
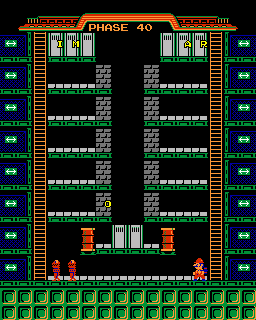
Solution
abc
Letters
- M: -
- A: -
- R: -
- I: -
- O: -
Phase 41
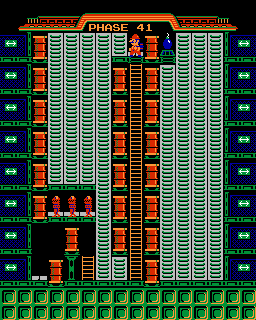
Solution
abc
Phase 42
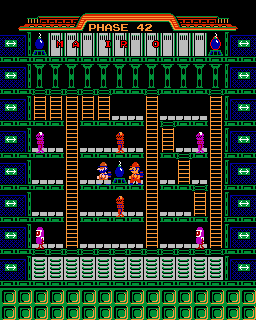
Solution
abc
Letters
- M: -
- A: -
- R: -
- I: -
- O: -
Prize Bomb
The bomb XXX is the Prize Bomb. If this is the third bomb to explode, a prize will appear.
Golden Hammer
To get the Golden Hammer, you need to activate the Prize Bomb with your 8th hammer swing.
Phase 43
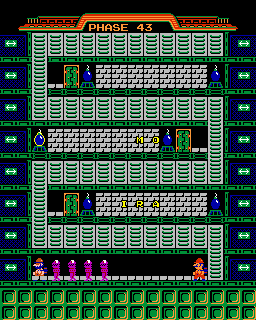
Solution
abc
Letters
- M: -
- A: -
- R: -
- I: -
- O: -
Prize Bomb
The bomb XXX is the Prize Bomb. If this is the third bomb to explode, a prize will appear.
Golden Hammer
To get the Golden Hammer, you need to activate the Prize Bomb with your 6th hammer swing.
Phase 44
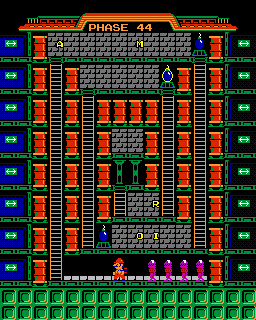
Solution
abc
Letters
- M: -
- A: -
- R: -
- I: -
- O: -
Prize Bomb
The bomb XXX is the Prize Bomb. If this is the third bomb to explode, a prize will appear.
Golden Hammer
To get the Golden Hammer, you need to activate the Prize Bomb with your 5th hammer swing.
Phase 45

Solution
abc
Letters
- M: -
- A: -
- R: -
- I: -
- O: -
Phase 46
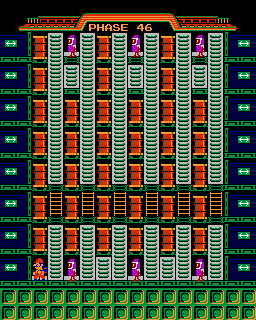
Solution
abc
Phase 47
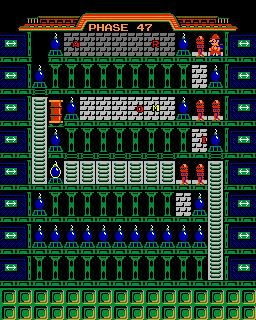
Solution
abc
Letters
- M: -
- A: -
- R: -
- I: -
- O: -
Prize Bomb
The bomb XXX is the Prize Bomb. If this is the third bomb to explode, a prize will appear.
Golden Hammer
To get the Golden Hammer, you need to activate the Prize Bomb with your 10th hammer swing.
Phase 48
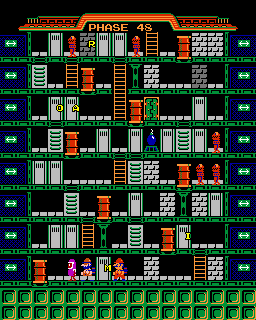
Solution
abc
Letters
- M: -
- A: -
- R: -
- I: -
- O: -
Phase 49
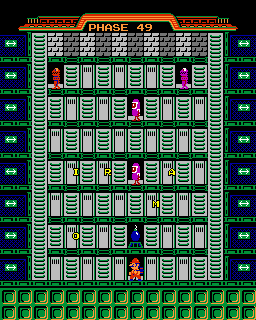
Solution
abc
Letters
- M: -
- A: -
- R: -
- I: -
- O: -
Phase 50
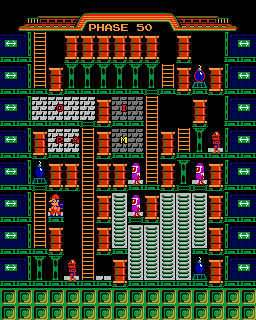
Solution
abc
Letters
- M: -
- A: -
- R: -
- I: -
- O: -
Prize Bomb
The bomb XXX is the Prize Bomb. If this is the third bomb to explode, a prize will appear.
Golden Hammer
To get the Golden Hammer, you need to activate the Prize Bomb with your 8th hammer swing.
Phase 51
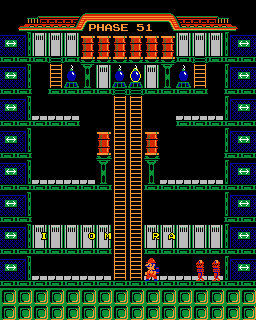
Solution
abc
Letters
- M: -
- A: -
- R: -
- I: -
- O: -
Prize Bomb
The bomb XXX is the Prize Bomb. If this is the third bomb to explode, a prize will appear.
Golden Hammer
To get the Golden Hammer, you need to activate the Prize Bomb with your 6th hammer swing.
Phase 52
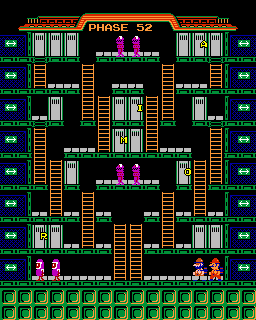
Solution
abc
Letters
- M: -
- A: -
- R: -
- I: -
- O: -
Phase 53
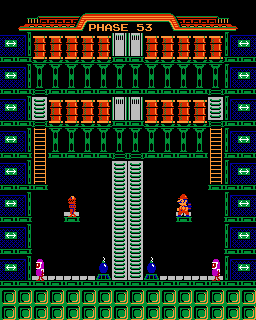
Solution
abc
Phase 54
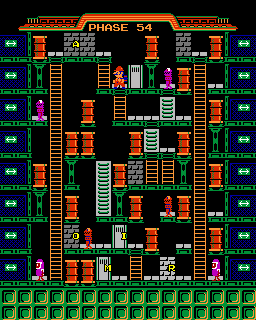
Solution
abc
Letters
- M: -
- A: -
- R: -
- I: -
- O: -
Phase 55
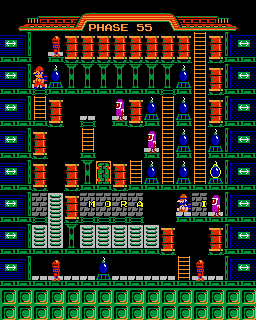
Solution
abc
Letters
- M: -
- A: -
- R: -
- I: -
- O: -
Prize Bomb
The bomb XXX is the Prize Bomb. If this is the third bomb to explode, a prize will appear.
Golden Hammer
To get the Golden Hammer, you need to activate the Prize Bomb with your 10th hammer swing.
Phase 56
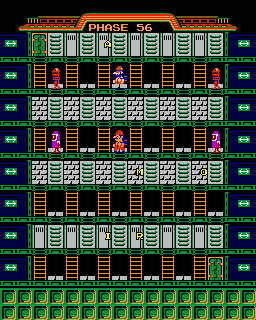
Solution
abc
Letters
- M: -
- A: -
- R: -
- I: -
- O: -
Phase 57
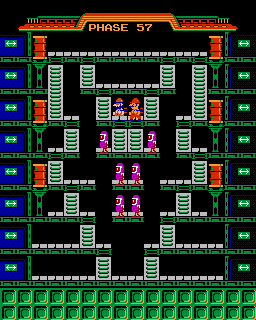
Solution
abc
Phase 58
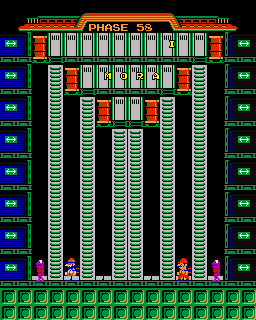
Solution
abc
Letters
- M: -
- A: -
- R: -
- I: -
- O: -
Phase 59
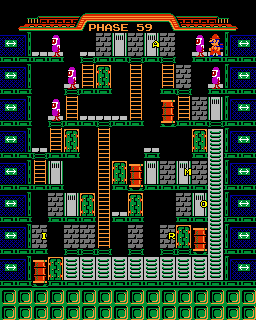
Solution
abc
Letters
- M: -
- A: -
- R: -
- I: -
- O: -
Phase 60
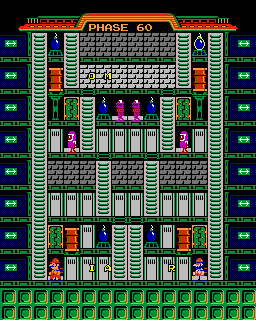
Solution
abc
Letters
- M: -
- A: -
- R: -
- I: -
- O: -
Prize Bomb
The bomb XXX is the Prize Bomb. If this is the third bomb to explode, a prize will appear.
Golden Hammer
To get the Golden Hammer, you need to activate the Prize Bomb with your 5th hammer swing.
Phase 61
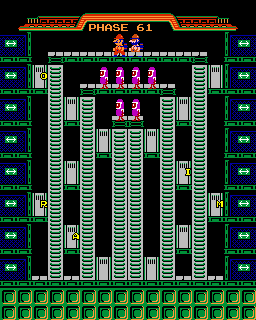
Solution
abc
Letters
- M: -
- A: -
- R: -
- I: -
- O: -
Phase 62

Solution
abc
Letters
- M: -
- A: -
- R: -
- I: -
- O: -
Prize Bomb
The bomb XXX is the Prize Bomb. If this is the third bomb to explode, a prize will appear.
Golden Hammer
To get the Golden Hammer, you need to activate the Prize Bomb with your 3rd hammer swing.
Phase 63

Solution
abc
Letters
- M: -
- A: -
- R: -
- I: -
- O: -
Prize Bomb
The bomb XXX is the Prize Bomb. If this is the third bomb to explode, a prize will appear.
Golden Hammer
To get the Golden Hammer, you need to activate the Prize Bomb with your 10th hammer swing.
Phase 64
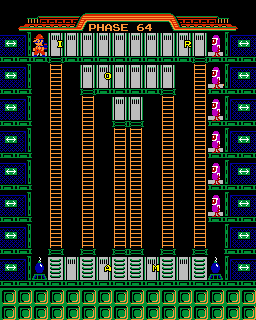
Solution
abc
Letters
- M: -
- A: -
- R: -
- I: -
- O: -
Phase 65
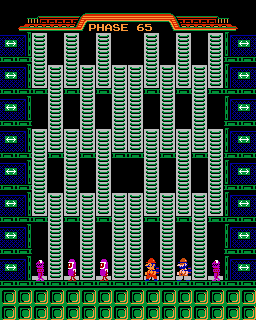
Solution
abc
Phase 66
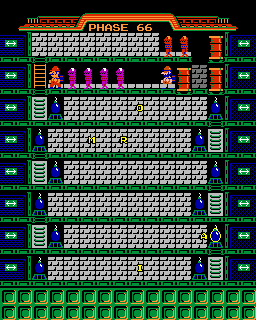
Solution
abc
Letters
- M: -
- A: -
- R: -
- I: -
- O: -
Prize Bomb
The bomb XXX is the Prize Bomb. If this is the third bomb to explode, a prize will appear.
Golden Hammer
To get the Golden Hammer, you need to activate the Prize Bomb with your 7th hammer swing.
Phase 67
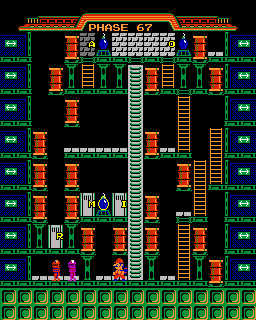
Solution
abc
Letters
- M: -
- A: -
- R: -
- I: -
- O: -
Prize Bomb
The bomb XXX is the Prize Bomb. If this is the third bomb to explode, a prize will appear.
Golden Hammer
To get the Golden Hammer, you need to activate the Prize Bomb with your 6th hammer swing.
Phase 68

Solution
abc
Letters
- M: -
- A: -
- R: -
- I: -
- O: -
Phase 69
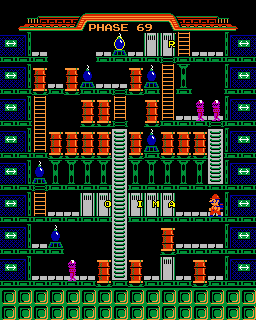
Solution
abc
Letters
- M: -
- A: -
- R: -
- I: -
- O: -
Prize Bomb
The bomb XXX is the Prize Bomb. If this is the third bomb to explode, a prize will appear.
Golden Hammer
To get the Golden Hammer, you need to activate the Prize Bomb with your 4th hammer swing.
Phase 70
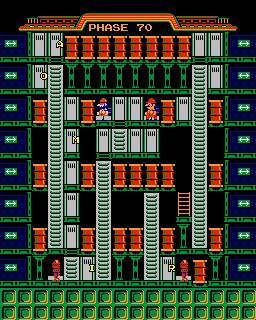
Solution
abc
Letters
- M: -
- A: -
- R: -
- I: -
- O: -
Phase 71
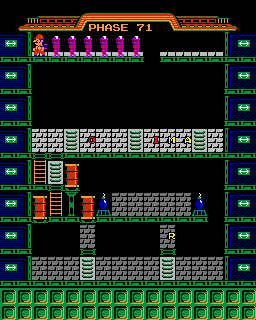
Solution
abc
Letters
- M: -
- A: -
- R: -
- I: -
- O: -
Phase 72
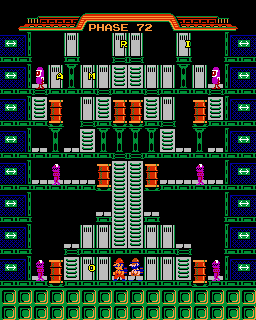
Solution
abc
Letters
- M: -
- A: -
- R: -
- I: -
- O: -
Phase 73
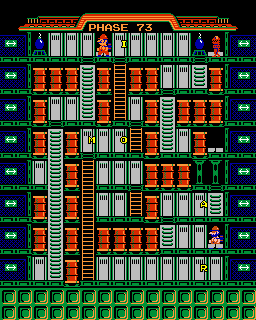
Solution
abc
Letters
- M: -
- A: -
- R: -
- I: -
- O: -
Phase 74

Solution
abc
Letters
- M: -
- A: -
- R: -
- I: -
- O: -
Phase 75
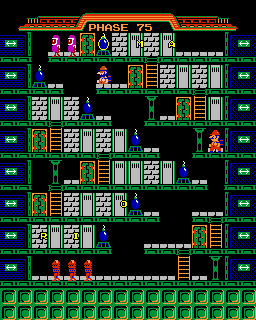
Solution
abc
Letters
- M: -
- A: -
- R: -
- I: -
- O: -
Prize Bomb
The bomb XXX is the Prize Bomb. If this is the third bomb to explode, a prize will appear.
Golden Hammer
To get the Golden Hammer, you need to activate the Prize Bomb with your 6th hammer swing.
Phase 76
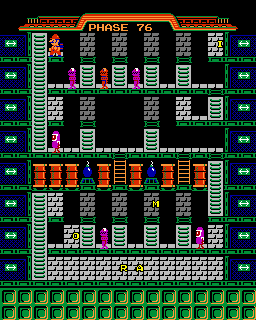
Solution
abc
Letters
- M: -
- A: -
- R: -
- I: -
- O: -
Phase 77
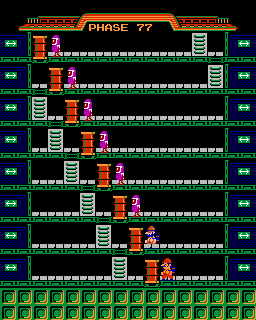
Solution
abc
Phase 78
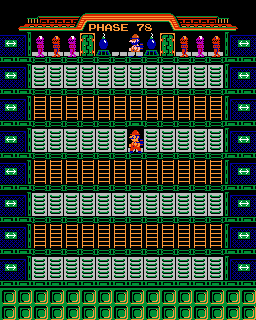
Solution
abc
Phase 79
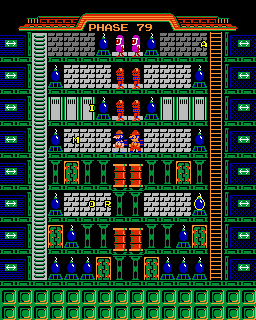
Solution
abc
Letters
- M: -
- A: -
- R: -
- I: -
- O: -
Prize Bomb
The bomb XXX is the Prize Bomb. If this is the third bomb to explode, a prize will appear.
Golden Hammer
To get the Golden Hammer, you need to activate the Prize Bomb with your 10th hammer swing.
Phase 80
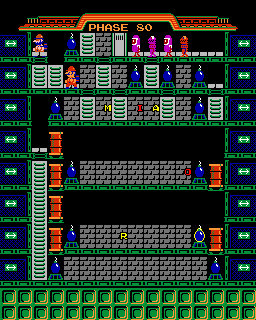
Solution
abc
Letters
- M: -
- A: -
- R: -
- I: -
- O: -
Prize Bomb
The bomb XXX is the Prize Bomb. If this is the third bomb to explode, a prize will appear.
Golden Hammer
To get the Golden Hammer, you need to activate the Prize Bomb with your 9th hammer swing.
Phase 81
Solution
abc
Letters
- M: -
- A: -
- R: -
- I: -
- O: -
Prize Bomb
The bomb XXX is the Prize Bomb. If this is the third bomb to explode, a prize will appear.
Golden Hammer
To get the Golden Hammer, you need to activate the Prize Bomb with your 8th hammer swing.
Phase 82
Solution
abc
Letters
- M: -
- A: -
- R: -
- I: -
- O: -
Prize Bomb
The bomb XXX is the Prize Bomb. If this is the third bomb to explode, a prize will appear.
Golden Hammer
To get the Golden Hammer, you need to activate the Prize Bomb with your 7th hammer swing.
Phase 83
Solution
abc
Letters
- M: -
- A: -
- R: -
- I: -
- O: -
Prize Bomb
The bomb XXX is the Prize Bomb. If this is the third bomb to explode, a prize will appear.
Golden Hammer
To get the Golden Hammer, you need to activate the Prize Bomb with your 6th hammer swing.
Phase 84
Solution
abc
Prize Bomb
The bomb XXX is the Prize Bomb. If this is the third bomb to explode, a prize will appear.
Golden Hammer
To get the Golden Hammer, you need to activate the Prize Bomb with your 5th hammer swing.
Phase 85
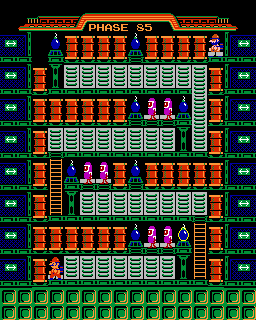
Solution
abc
Prize Bomb
The bomb XXX is the Prize Bomb. If this is the third bomb to explode, a prize will appear.
Golden Hammer
To get the Golden Hammer, you need to activate the Prize Bomb with your 4th hammer swing.
Phase 86

Solution
abc
Letters
- M: -
- A: -
- R: -
- I: -
- O: -
Prize Bomb
The bomb XXX is the Prize Bomb. If this is the third bomb to explode, a prize will appear.
Golden Hammer
To get the Golden Hammer, you need to activate the Prize Bomb with your 3rd hammer swing.
Phase 87
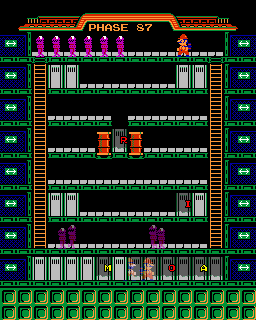
Solution
abc
Letters
- M: -
- A: -
- R: -
- I: -
- O: -
Phase 88
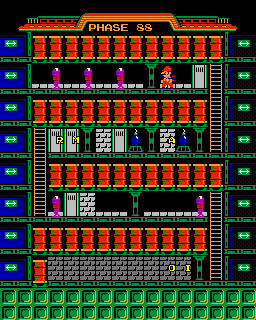
Solution
abc
Letters
- M: -
- A: -
- R: -
- I: -
- O: -
Phase 89
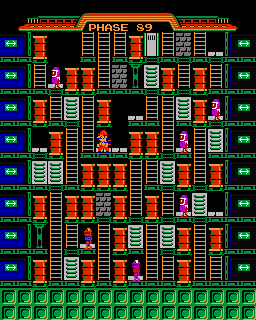
Solution
abc
Phase 90
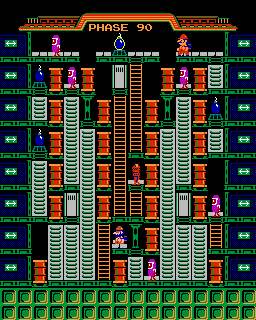
Solution
abc
Prize Bomb
The bomb XXX is the Prize Bomb. If this is the third bomb to explode, a prize will appear.
Golden Hammer
To get the Golden Hammer, you need to activate the Prize Bomb with your 7th hammer swing.
Phase 91
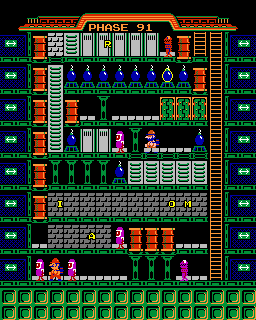
Solution
abc
Letters
- M: -
- A: -
- R: -
- I: -
- O: -
Prize Bomb
The bomb XXX is the Prize Bomb. If this is the third bomb to explode, a prize will appear.
Golden Hammer
To get the Golden Hammer, you need to activate the Prize Bomb with your 6th hammer swing.
Phase 92
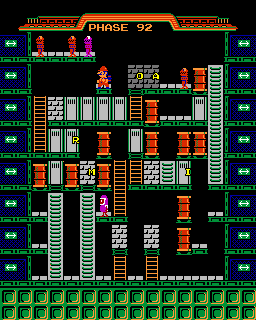
Solution
abc
Letters
- M: -
- A: -
- R: -
- I: -
- O: -
Phase 93
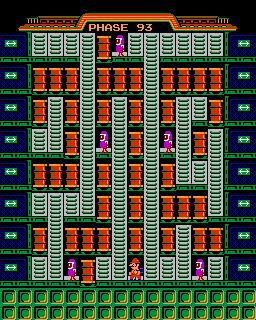
Solution
abc
Phase 94
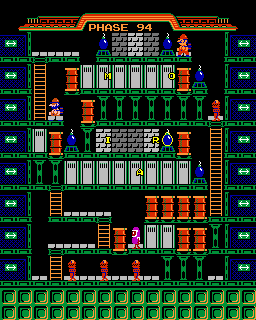
Solution
abc
Letters
- M: -
- A: -
- R: -
- I: -
- O: -
Prize Bomb
The bomb XXX is the Prize Bomb. If this is the third bomb to explode, a prize will appear.
Golden Hammer
To get the Golden Hammer, you need to activate the Prize Bomb with your 3rd hammer swing.
Phase 95
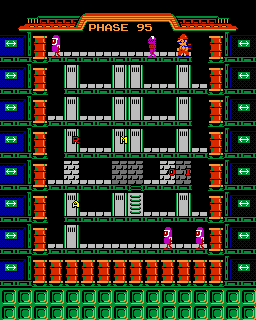
Solution
abc
Letters
- M: -
- A: -
- R: -
- I: -
- O: -
Phase 96

Solution
abc
Letters
- M: -
- A: -
- R: -
- I: -
- O: -
Prize Bomb
The bomb XXX is the Prize Bomb. If this is the third bomb to explode, a prize will appear.
Golden Hammer
To get the Golden Hammer, you need to activate the Prize Bomb with your 9th hammer swing.
Phase 97
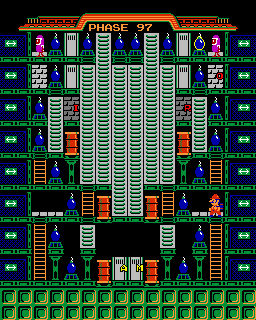
Solution
abc
Letters
- M: -
- A: -
- R: -
- I: -
- O: -
Prize Bomb
The bomb XXX is the Prize Bomb. If this is the third bomb to explode, a prize will appear.
Golden Hammer
To get the Golden Hammer, you need to activate the Prize Bomb with your 8th hammer swing.
Phase 98
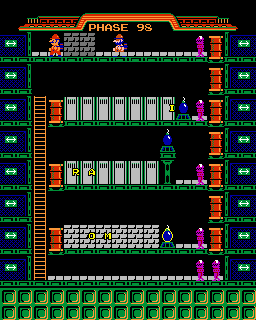
Solution
abc
Letters
- M: -
- A: -
- R: -
- I: -
- O: -
Prize Bomb
The bomb XXX is the Prize Bomb. If this is the third bomb to explode, a prize will appear.
Golden Hammer
To get the Golden Hammer, you need to activate the Prize Bomb with your 7th hammer swing.
Phase 99
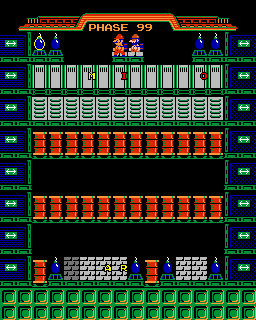
Solution
abc
Letters
- M: -
- A: -
- R: -
- I: -
- O: -
Prize Bomb
The bomb XXX is the Prize Bomb. If this is the third bomb to explode, a prize will appear.
Golden Hammer
To get the Golden Hammer, you need to activate the Prize Bomb with your 6th hammer swing.
Phase 100
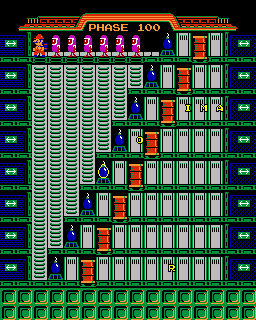
Solution
abc
Letters
- M: -
- A: -
- R: -
- I: -
- O: -
Prize Bomb
The bomb XXX is the Prize Bomb. If this is the third bomb to explode, a prize will appear.
Golden Hammer
To get the Golden Hammer, you need to activate the Prize Bomb with your 5th hammer swing.
Prize Bomb Table
The prize you receive for exploding a Prize Bomb is based on two factors:
- The Phase number you are playing
- The number of times you swing the hammer after the Phase begins (including swings that do not hit anything)
For example, if you hit the Prize Bomb on Phase 4 with your 5th hammer swing, you will get the Golden Hammer. But if you hit the Prize Bomb with your 4th hammer swing, you will get the Pig.
Breaking the Prize Bomb with your 9th hammer swing is the same as hitting it with your 1st swing. The table will loop every 8 swings. If you miss your shot, swing your hammer a few more times and try again.
If you want to decide which prize you receive, use this prize table. Find the Phase you are on (only Phases with Prize Bombs are shown). Each time you swing your hammer after the Phase begins, move along the table by one column.
| Phase | 1 | 2 | 3 | 4 | 5 | 6 | 7 | 8 |
|---|---|---|---|---|---|---|---|---|
| Phase 4 | Santa | Pig | Cat | Pig | Hammer | Santa | Pig | Cat |
| Phase 6 | Cat | Pig | Hammer | Santa | Pig | Cat | Santa | Pig |
| Phase 9 | Santa | Pig | Cat | Santa | Pig | Cat | Pig | Hammer |
| Phase 10 | Pig | Cat | Santa | Pig | Cat | Pig | Hammer | Santa |
| Phase 13 | Pig | Cat | Pig | Hammer | Santa | Pig | Cat | Santa |
| Phase 15 | Pig | Hammer | Santa | Pig | Cat | Santa | Pig | Cat |
| Phase 16 | Hammer | Santa | Pig | Cat | Santa | Pig | Cat | Pig |
| Phase 21 | Pig | Cat | Pig | Hammer | Santa | Pig | Cat | Santa |
| Phase 22 | Cat | Pig | Hammer | Santa | Pig | Cat | Santa | Pig |
| Phase 31 | Pig | Hammer | Santa | Pig | Cat | Santa | Pig | Cat |
| Phase 34 | Pig | Cat | Santa | Pig | Cat | Pig | Hammer | Santa |
| Phase 36 | Santa | Pig | Cat | Pig | Hammer | Santa | Pig | Cat |
| Phase 39 | Pig | Hammer | Santa | Pig | Cat | Santa | Pig | Cat |
| Phase 43 | Cat | Santa | Pig | Cat | Pig | Hammer | Santa | Pig |
| Phase 44 | Santa | Pig | Cat | Pig | Hammer | Santa | Pig | Cat |
| Phase 47 | Pig | Hammer | Santa | Pig | Cat | Santa | Pig | Cat |
| Phase 51 | Cat | Santa | Pig | Cat | Pig | Hammer | Santa | Pig |
| Phase 55 | Pig | Hammer | Santa | Pig | Cat | Santa | Pig | Cat |
| Phase 60 | Santa | Pig | Cat | Pig | Hammer | Santa | Pig | Cat |
| Phase 62 | Cat | Pig | Hammer | Santa | Pig | Cat | Santa | Pig |
| Phase 63 | Pig | Hammer | Santa | Pig | Cat | Santa | Pig | Cat |
| Phase 66 | Pig | Cat | Santa | Pig | Cat | Pig | Hammer | Santa |
| Phase 67 | Cat | Santa | Pig | Cat | Pig | Hammer | Santa | Pig |
| Phase 69 | Pig | Cat | Pig | Hammer | Santa | Pig | Cat | Santa |
| Phase 75 | Cat | Santa | Pig | Cat | Pig | Hammer | Santa | Pig |
| Phase 79 | Pig | Hammer | Santa | Pig | Cat | Santa | Pig | Cat |
| Phase 80 | Hammer | Santa | Pig | Cat | Santa | Pig | Cat | Pig |
| Phase 81 | Santa | Pig | Cat | Santa | Pig | Cat | Pig | Hammer |
| Phase 82 | Pig | Cat | Santa | Pig | Cat | Pig | Hammer | Santa |
| Phase 83 | Cat | Santa | Pig | Cat | Pig | Hammer | Santa | Pig |
| Phase 84 | Santa | Pig | Cat | Pig | Hammer | Santa | Pig | Cat |
| Phase 85 | Pig | Cat | Pig | Hammer | Santa | Pig | Cat | Santa |
| Phase 86 | Cat | Pig | Hammer | Santa | Pig | Cat | Santa | Pig |
| Phase 90 | Pig | Cat | Santa | Pig | Cat | Pig | Hammer | Santa |
| Phase 91 | Cat | Santa | Pig | Cat | Pig | Hammer | Santa | Pig |
| Phase 94 | Cat | Pig | Hammer | Santa | Pig | Cat | Santa | Pig |
| Phase 96 | Hammer | Santa | Pig | Cat | Santa | Pig | Cat | Pig |
| Phase 97 | Santa | Pig | Cat | Santa | Pig | Cat | Pig | Hammer |
| Phase 98 | Pig | Cat | Santa | Pig | Cat | Pig | Hammer | Santa |
| Phase 99 | Cat | Santa | Pig | Cat | Pig | Hammer | Santa | Pig |
| Phase 100 | Santa | Pig | Cat | Pig | Hammer | Santa | Pig | Cat |
Note: Phase 42 and Phase 50 each have a Prize Bomb programmed, but it’s impossible for them to be the third bomb to explode. They are not shown on the table.
Clear the Demo Sequence
If you wait on the title screen, a demo will play showing Phase 82. It ends when Mario runs into an enemy on the ladder.
It's possible to rescue Mario with a button code, only for him to run into another enemy.
By changing the button code at key points, it's possible to help Mario clear the Phase successfully.
Clear Part 1
Mario breaks the first four walls, climbs up a ladder and emerges on the top-right side of the stage. He normally runs into the enemies on the ladder. Before he reaches the ladder:
Hold A + B on Controller 1 and Up on Controller 2.
Mario will stop before getting on the ladder and wait until the enemies have passed.
Clear Part 2
Mario will climb up the ladder, hit a bomb, then return to the ladder. Normally, he will climb to the top into the path of the oncoming enemies. Before he reaches the top of the ladder:
Hold A + B on Controller 1 and Down on Controller 2.
Mario will dismount the ladder early and allow the enemies to pass.
Clear Part 3
Mario will climb to the top of the ladder, open the door, run under a fireball and then use the bomb to break the walls and drop to the bottom of the stage. Normally, Mario runs right into the enemy. After Mario drops down:
Hold A + B on Controller 1 and Left on Controller 2.
Mario will run to the left and climb the ladders.
Clear Part 4
Mario will climb to the top of a ladder. Normally he will start climbing back down the ladder into the path of a pursuing Gotcha Wrench.
As soon as he climbs to the top of the ladder, hold A + B on Controller 1 and Right on Controller 2.
Mario will continue climbing up and complete the rest of the Phase.
Design Mode Codes
On the Design mode screen, enter the following button combinations on Controller 2 to create a Phase with the following layouts:
- A and B: Reset the Phase
- Right and A: Fill the Phase with empty space
- Down and A: Fill the Phase with yellow ladders
- Left and A: Fill the Phase with stone ladders
- Up and A: Fill the Phase with bombs
- Right and B: Fill the Phase with walls
- Down and B: Fill the Phase with light brick walls
- Left and B: Fill the Phase with dark brick walls
- Up and B: Rebuild the Phase currently selected on the title screen
Phase Names
When you rebuild an existing Phase (Up and B on Controller 2), you can see the name given to the Phase by the original designer. This is one of the earliest examples of staff credits appearing in a Nintendo game.
Show/hide table of Phase names
Phases with blank names have been removed.
| Phase | Name |
|---|---|
| 1 | TAROMEN.1 |
| 2 | JAHRASTFAR |
| 4 | TAKAMEN.I |
| 5 | ♥NINTENDO♥ |
| 8 | NINTENDON |
| 10 | TAKAMEN.I |
| 14 | AKEMI.YAB♥ |
| 15 | K.NAKAJIMA |
| 17 | TAROMEN.1 |
| 18 | ♥ OOTA ♥ |
| 21 | TAROMEN.2 |
| 24 | ♥YOICHIRO♥ |
| 25 | T.SENGOKUN |
| 27 | ♥♥IMAKUY.H |
| 32 | J !! |
| 33 | ♥ 8000 ♥ |
| 35 | ♥NINTENDO♥ |
| 36 | ♥NAKAMURA♥ |
| 38 | ESPINA |
| 39 | T.NAKAMURA |
| 42 | T.NAKAMURA |
| 43 | I♥TOMOYO |
| 46 | SUZUKI♥ |
| 47 | TOSHIYUKI! |
| 48 | SUZUKI |
| 49 | MOMO♥MAMI |
| 50 | TAROMEN.1 |
| 52 | AKINA♥CHAN |
| 55 | TAROMEN.2 |
| 58 | ♥♥♥♥♥♥♥♥♥♥ |
| 61 | !!!!!!!!!! |
| 62 | TRY IT ! |
| 65 | ♥SOBAJIMA♥ |
| 66 | ♥MIKU♥CHAN |
| 71 | HACCYOTARO |
| 75 | I ♥ SEIKO |
| 76 | MESHIJIMA♥ |
| 77 | Y.S♥AKINA! |
| 78 | NAKAMURA |
| 79 | TOSHIYUKI |
| 80 | ♥K.IIJIMA♥ |
| 81 | - XVZVLJ- |
| 83 | T.N♥TOMOYO |
| 84 | YOICHIRO.S |
| 85 | TAKAMEN.I |
| 86 | 82-1109T.N |
| 88 | KUNIO! |
| 89 | ♥NANTENDO♥ |
| 90 | JAHRASTFAR |
| 91 | MEMORU♥H.S |
| 92 | KYOTARO♥ |
| 93 | Y.SOBAJIMA |
| 94 | K.NAKAJIMA |
| 95 | TOSHI-HIDE |
| 96 | ZURIMEN.1 |
| 98 | T.NAKAMURA |
| 99 | ♥ HIDEO! ♥ |
| 100 | GOOD-BYE |